When it comes to creating a beautiful outdoor space, many homeowners opt for the classic choice: a sod lawn. Known for its natural beauty and traditional appeal, sod, or natural grass, offers a sense of instant gratification and a lush green look. It’s the image that often comes to mind when we think of a perfect home with a perfect lawn – children playing, pets frolicking, and adults relaxing and soaking in the beauty of nature right in their backyard. But as idyllic as this image may be, maintaining a sod lawn requires a significant investment of time and resources. Here is more information related to Sod Lawns:
In conclusion, whether you’re planning a DIY project or considering professional installation, accurate measurement, and calculation are the first steps toward a successful artificial grass installation. Whether you’re a homeowner looking for a pet-friendly turf for your furry friends, or a business owner planning to install a synthetic lawn in a sports field or playground, you would need to do this.
Remember, every square foot counts. Overestimating can lead to unnecessary expenses, while underestimating can result in an incomplete grass lawn. So, take your time, measure carefully, and don’t hesitate to double-check your calculations. With the right preparation, you can ensure a successful artificial grass installation. Say goodbye to mowing and fertilizing, and say hello to a lush, green, and low-maintenance lawn that will last for years to come.
Once you’ve calculated the total amount of artificial grass you need, you can start to estimate the cost of your project. The cost of artificial grass can vary widely depending on the quality, brand, and type of grass you choose. High-quality turf products are more durable and have longer lifespans while lesser-quality turf products are cheaper but might not look or feel like natural grass.
Here’s how you can estimate the cost of synthetic turf :
- Find the Price per Square Foot: Check the price of the artificial grass per square foot. This information is usually available on the product label or the retailer’s website.
- Calculate the Total Cost: Multiply the price per square foot by the total square footage (including the extra 10% for cutting and shaping) to get the total cost of the fake grass.
Remember, this is just the average cost of the artificial grass itself. You should also consider other costs associated with the artificial turf installation, such as the cost of any necessary tools, infill material, and potentially hiring a professional installer if you’re not planning a DIY installation. Don’t forget to get free quotes from synthetic grass retailers and landscaping professionals. You can also refer to our blog on artificial grass costs to understand how much artificial turf costs.
Artificial grass typically comes in 12-foot and 15-foot wide rolls. When determining how much artificial grass you need, keep this in mind to minimize the number of seams.
For example, if your space is 20 feet wide, you would need two 12-foot wide turf rolls, resulting in a total of 24 feet in width. With the right preparation and high-quality turf rolls, you can transform your space into a lush, green, and low-maintenance haven.
Artificial grass installation is not always a straightforward process. Depending on the shape and size of your space, you may need to cut and shape the turf to ensure it fits perfectly. This could be the case if your space has curved edges, unusual angles, or if it’s divided into different sections.
Cutting and shaping the turf can lead to some wastage. For instance, if you have to cut a circular area out of a square piece of turf, you’ll be left with some leftover material that might not be usable elsewhere.
To account for such scenarios, it’s a good idea to add an extra 10% to your total square footage. This buffer ensures you won’t run out of material in case of any miscalculations or unexpected challenges during the installation process. It’s a small step that can save you from a lot of stress and help keep your project on track.
For Rectangular or Square Spaces
Measuring the area of rectangular or square spaces is very easy. You can just:
- Measure the Length: Use your tape measure to measure the longest side of your space from end to end.
- Measure the Width: Next, measure the shortest side of your space from end to end.
- Calculate the Area: Multiply the length by the width to get the total square footage of your space.
For Circular Spaces
If your space is circular:
- Measure the Diameter: Measure the diameter of the circle (the distance across the circle through the center).
- Calculate the Radius: The radius is half of the diameter.
- Calculate the Area: The area of a circle is πr² sq ft (pi times the radius squared).
For Triangular Spaces
If your space is triangular, you’ll need to measure the base and the height of the triangle:
- Measure the Base: The base of the triangle is its bottom side. Use your tape measure to measure the length of the base from one end to the other.
- Measure the Height: The height of the triangle is the distance from the base to the top point of the triangle. Measure this distance.
- Calculate the Area: Multiply the base by the height and then divide by 2 to get the area in square feet.
Accurate measurement is crucial when planning for artificial grass installation. Here are some reasons why:
- Avoid Unnecessary Expenses: Overestimating the amount of artificial grass you need could result in unnecessary expenses. You don’t want to end up paying for more grass than you need.
- Prevent Incomplete Projects: On the other hand, underestimating could leave you with an incomplete project. It’s frustrating to run out of material midway through installation.
- Better Price Comparison: Knowing the exact square footage of your space can help you better compare prices and options when shopping for artificial grass products. It allows you to get a more accurate estimate of the total cost.
- Efficient Installation Process: Whether you’re a DIY enthusiast taking on the installation process yourself or considering professional installation, having a clear idea of the amount of artificial grass required can make the process smoother and more efficient.
- Optimal Use of Space: Accurate measurement ensures that every square foot of your space is optimally used. This is especially important for complex landscapes with unique shapes.

Now that you have designed and constructed a retaining wall, it is time to ensure its longevity through regular maintenance. Proper maintenance not only extends the life of the wall but also prevents costly repairs and potential structural failures. Here’s a guide on how to keep your retaining wall in top condition.
Routine Inspections
Regularly inspect your retaining wall for signs of damage, such as cracks, bulging, or leaning. Check for any areas where soil or water is accumulating, as this could indicate drainage issues. Addressing these problems early can prevent more significant damage later on.

Designing a retaining wall involves more than just stacking retaining wall blocks and hoping they hold up. Whether you’re working with concrete walls, segmental retaining walls, or traditional stone walls, here are some basic steps for designing a retaining wall
1. Start with a Solid Foundation
The foundation is the backbone of any retaining wall. It must be strong enough to support the wall and resist the pressure from the soil behind it.
- Preparation: Proper site preparation involves clearing debris around the construction location, grading the site, and ensuring a stable base.
- Depth: The foundation should be deep enough to prevent the wall from shifting or settling. A common rule of thumb is to bury about one-eighth to one-quarter of the height of the wall below the ground.
- Material: Use compacted gravel or crushed stone for the foundation, which provides excellent drainage and stability. Usually, for concrete walls, we lay reinforced concrete footing, while for stone walls, it may involve compacting a gravel base.
2. Ensure Proper Drainage
Water is one of the leading causes of retaining wall failure. To prevent this you need to relieve hydrostatic pressure that builds up behind the wall. You can do this by using:
- Gravel Backfill: Use gravel or crushed stone behind the wall to allow water to drain freely.
- Weep Holes: Incorporate weep holes at the base of the wall to let water escape.
- Drainage Pipe: Install perforated drainage pipes behind the wall to channel water away from the structure.
- Slope Management: Ensure the surrounding landscape is graded to direct surface water away from the wall.
3. Design for Stability
As we already mentioned, a retaining wall must be designed to resist the forces that push against it. To achieve this, consider using:
- Wall Batter: Angle the wall slightly backward into the soil (a process known as batter) to improve stability and prevent outward movement. One common design guideline is to design a 1-inch setback for every 1 foot of wall height.
- Step Back: For taller walls, consider a stepped-back design where the wall is built in multiple tiers or sections, reducing the load on each part of the wall.
- Reinforcement: For retaining walls over a certain height (typically four feet), include reinforcement such as geogrid or steel rebar to strengthen the structure. This helps distribute loads evenly.
4. Consider Local Building Codes and Regulations
Adhering to local building codes is not just a legal requirement but also a best practice for ensuring your retaining wall is safe and compliant. Key considerations include:
- Permits: Determine whether your project requires a building permit, especially for walls over a certain height.
- Engineering Approval: For complex or large-scale walls, a civil engineer’s approval may be necessary to confirm that the design meets all safety standards.
- Setbacks: Check local regulations regarding setbacks from property lines, utilities, and other structures. Following these guidelines ensures that your wall meets all legal requirements and avoids potential issues down the road.
5. Building and Reinforcing the Wall
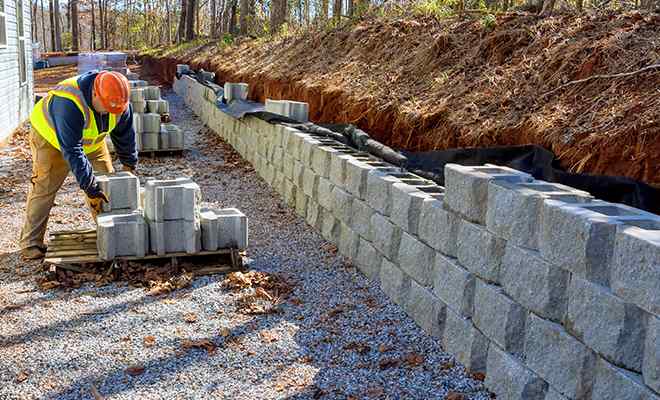
The construction of a retaining wall can vary depending on the type of wall. For example, while building cantilever retaining walls, it’s essential to properly place rebar and pour concrete in stages to avoid cold joints. When building a segmental retaining wall, the key is to stagger the joints and ensure that each layer is level.
6. Finishing Touches
The final steps in wall construction include adding capstones, applying any desired finishes, and integrating the wall into the surrounding landscape. Consider adding aesthetic elements like lighting, water features, or decorative tiles to enhance the designed retaining wall’s appearance. These finishing touches, when done right, can heavily contribute to the wall’s overall function and durability.
In areas prone to seismic activity, retaining walls must be designed to withstand the additional forces generated by earthquakes. This often involves incorporating flexible materials, using geogrid reinforcement, and ensuring that the wall’s design meets specific seismic codes. If you are planning to take up a more environmentally friendly project, consider using sustainable materials for minimal environmental impact.